Cheap and inexpensive things to do with kids

Looking for things to do with your kids?
If you don't have much money to go anywhere but want to spend the afternoon with your kids doing something with them, then this lens might be the perfect thing for you!
This lens shows you how to do and make interesting things with your kids, by using a few bits and bobs from a craft shop and mostly recycled items!

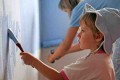
The obvious...the easiest...DRAWING!
This is probably the thing that everybody thinks of first. And guess why? Because it really is such a good and simple idea! All you need is paper and crayons or coloured pencils.
Although you could just do it the simple way - giving the kids a piece of paper and some pens and getting them to draw, it's much more exciting and interesting for both you and the kids if you add something else to it.
Some ideas include:
>Tell them what to draw or give them ideas
>Have a competition and you be the judge
>Get them to draw pictures and everyone else guess what it is they've drawn
WHAT YOU WILL NEED:
Paper
Pens/colouring pencils/crayons/felt tip pens

Painting
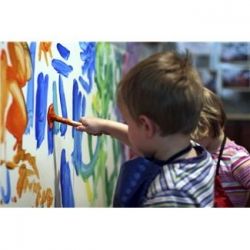
Painting is almost as easy as drawing - the downside is that it's a lot more messy! You'll probably find that your kids will enjoy painting a lot more than drawing, as it's something they probably don't do often.
Make sure that you have a table if your kids are going to be painting. Get a plastic or waterproof tablecloth or mat that will be easy to clean. You don't want to put down your best tablecloth and get it all covered in paint that won't come out.
Get aprons for your kids. This will prevent you having to do heaps of washing to get paint out of their clothes.
Get all different colours of kids paints. Paints made especially for children are usually a lot easier to clean up and wash off things. Get the four primary colours - red, yellow, blue and green...if you want other colours you can always mix the ones you have.
This activity requires you to sit with your children for most of the time they are doing it - especially if your children are very young. The last thing you want is to turn around and see them painting your new furniture!
TOP TIP #1: If the table you are using if close to a wall which is covered in wallpaper, pull the table away from the wall to prevent the paint ruining the wallpaper.
TOP TIP #2: Save any yogurt pots and small plastic containers so you can put the paint into them - this will keep the actual paint tubs clean. Plus...if it gets knocked over, you've lost a lot less paint than if your kids were dipping their brushes in and out of the tub of paint!
WHAT YOU WILL NEED:
Paper/Card
Paint Brushes
Poster Paints
Containers/Yogurt pots (optional but recommended!)

Paper Mache Head!
This is something I remember doing when I was little, and I loved it! I remember my mum making one with me once, and we sat it on the window sill and everybody walking past the house was looking at it and smiling!
It involves these 5 simple steps:
1. Blow up a balloon
2. Cover it with glue
3. Stick pieces of old newspaper onto it - about 3 layers will be enough
4. Paint over it with a colour of your choice
5. Decorate it and give it a face!!
This is so much fun to do - your kids will love it. To make it more fun, tell them to come up with a name for it. You could make some hair for it, give it a hat, a bow tie, a scarf, or anything else you think would work.
TOP TIP: If you have an old cottage cheese pot or large yogurt pot, balance the balloon in it (with the lid off) and then it will stand up and you can put it on your window sill/table/fireplace on display!
WHAT YOU WILL NEED:
Balloon
Glue
Newspaper
Bits and pieces to decorate it
Large yogurt pot or other pot (optional)

Sock Head!!
This was something else that my mum used to do with me and my siblings. As far as I know, this is something that she thought of herself, so I doubt you'll find any instructions or photographs anywhere else online!
Socks heads are quite simple to make, and like the paper mache heads, your kids can name them and show them off!
First of all, get a pair of old socks. Put one of the socks into the other sock. Holding the end of the sock that has the other sock inside it, wrap the rest of the sock around it again and again (as if you were putting a pair of socks together) until you can't wrap it up anymore. It should look like a ball now. If it doesn't, you've probably done something wrong along the way.
Now all that's left to do is let your kids decorate the "head"!! Just like the paper mache balloon, you can just let them decorate it will paper, card and old bits and pieces.
You can ask them if they want to give them names, and they can give them to their friends as well!
WHAT YOU WILL NEED:
Old socks
Bits and pieces
Glue (to glue the things on to make a face)

Collage
Kids will absolutely love making a college! All you have to do is collect things from around your house and in your kitchen and put it all in a box. Get some pieces of card (paper will work but card works better) and let your kids decorate it with all your recycled rubbish!
Some ideas for what you can use:
Sweet wrappers
Kitchen foil (watch the sharp edges though)
Wrappers from around cans and bottles
Bottle tops
Old Christmas/birthday cards
Leaflets and pamphlets that have come through the post
Leaves and twigs from in your garden
You can either use individual pieces of card for each of the children participating in this activity, or you could stick a few pieces all together, and make a bit picture or scene. I remember doing a massive collage of a beach when I was little!
TOP TIP: You can also use certain types of food - dry rice, pasta, sticks of spaghetti. Make sure you don't use foods that will start to smell after a few weeks - that's the last thing you want!
WHAT YOU WILL NEED:
Card
Glue
Sellotape
Recycled bits and pieces

Making cards!
This activity is ideal if your children have friends that live far away, or they just want to give people their handmade cards!
Card is the only thing that is essential, because the card can then be decorated with anything that you like. If you are planning to do this with your kids and you have a birthday coming up (either your birthday, your kids, or someone who will give you their cards when they've finished!), then save the cards and you can get ideas from them. You can also cut out the pictures and items from the birthday cards and stick them onto the cards that your kids are making.
Other ideas include:
Draw pictures on the card
Paint pictures on the card
Do a collage on the card
WHAT YOU WILL NEED:
Card
Glue
Things to stick on the cards

Paper Flowers
These are really simple to make, once you know how to. They make great gifts for the kids to give to people - so they're ideal if it's close to Mothers Day or a grandma's/aunty's birthday.
If you want to make some paper flowers with the kids, follow these simple steps:
1. Get a straw.
2. Cut some tissue paper into circles - about 4-5cm in diameter.
3. Make a small slit in the middle of each tissue paper piece.
4. Place a piece of tissue paper onto the straw so the straw goes through the slit in the middle. The tissue paper should be about an inch down the straw.
5. Using a small piece of sellotape, make sure that the tissue paper is held in place by sticking it down UNDER the piece of tissue paper.
6. Start putting the rest of the tissue paper onto the straw, scrunching each piece as it goes on.
7. When you get to the last piece, stick it down again at the top with a piece of sellotape to make sure it stays there and all the "petals" don't fall off!
8. You have your first flower! You can just have the one or make a whole bunch of them!
TOP TIP: Use different colours for the petals. You can mix different colours in the same flower, like in the picture!
WHAT YOU WILL NEED:
Straws (you can use other things for the stems, but straws are probably the easiest and cheapest)
Tissue paper
Sellotape

Great stuff from Amazon!


Take the Poll!

How often do you participate in making things with your children?
Please let me know if you found any good ideas from this lens!